How to Add Branches?
Introduction
As a business grows, it often expands to multiple locations to reach a wider customer base. With several branches in operation, it’s crucial to monitor transactions at each branch to assess individual performance and the overall health of the organization. Zoho Books makes this easier by allowing you to create and manage branches, enabling you to track transactions by location effectively.
Basic Functions in Branches
Enable Branches
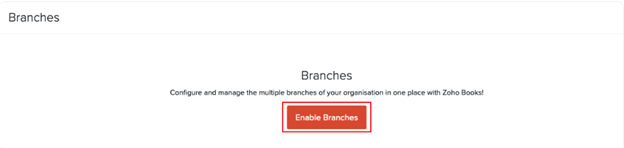
To start using the Branches feature in Zoho Books, follow these steps:
- Go to Settings (located at the top-right corner of the page).
- Click on Branches under the Organisation section.
- Click Enable Branches to activate the feature.
Prerequisite:
1. To enable Branches, your business should have a registered GSTIN and enabled GST Settings in Zoho Books.
2. Only the admins of the organisation can enable this feature in Zoho Books.
3. Once you enable Branches, you will not be able to disable it in Zoho Books. However, you can delete the branch or mark it inactive.
Create Branch
Once you’ve enabled the Branches feature, follow these steps to add a new branch:
- Go to the Settings menu at the top-right corner of the page.
- Select Branches under the Organisation
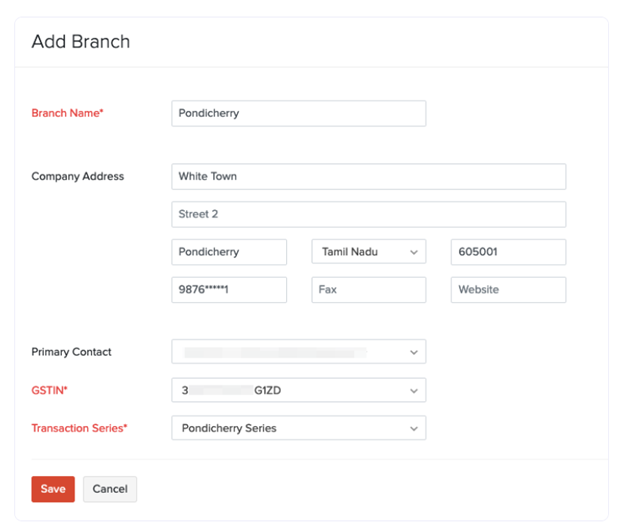
- Click the Add Branch button in the top-right corner of the Branches page. A new form will open.

Fill in the Branch Details:
- Branch Name: Enter the name of the branch.
- Address: Provide the full address of the branch.
- Primary Contact: Select the primary contact person for this branch.
- GSTIN: Choose the GSTIN to associate with this branch.
- To add a new GSTIN, click + New GSTIN.
- Transaction Series: Select a transaction series to help track transactions for this specific branch.
- If none exist, click + New Transaction Series from the dropdown to create one.
- Click Save.
Configure Transaction Series
Some organizations may prefer to have a unique transaction series for each branch. For example:
- Branch 1: Invoice numbers could follow the format (BR1 INV – 001)
- Branch 2: Invoice numbers could be (BR2 INV – 001)
This helps in easily identifying the origin of transactions.
Steps to Create a New Transaction Series:
- Go to Settings at the top-right corner of the page.
- Select Branches under the Organisation section.
- Go to the Transaction Series Preferences tab.
- Click the + New Transaction Series button – a pop-up window will appear.
- Fill in the following details:
- Name: Enter a name for the series (e.g., branch name).
- Branch: Select the branch you want to associate with this series.
- Prefix & Suffix: Define the prefix and/or suffix you’d like to use for the transaction numbers.
- 6. Click Save.
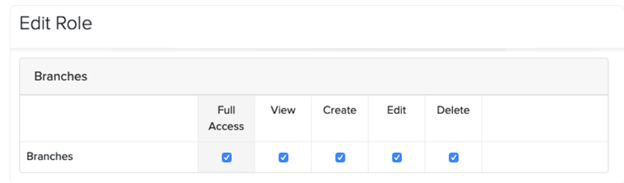
User Permissions
Only the Admin of an organisation has the permission to enable branches in Zoho Books. Also, only they can create branches and access them as well. If you would like to extend these permissions to other users in your organisation, here’s what you’ll have to do:
- Go to Settings at the top-right corner of the page.
- Select Roles under the Users & Roles section.
- Scroll down to find the Branches permission section.
- Check the boxes next to the permissions you wish to assign (e.g., view, create, or edit branches).
- Click Save.