How to create new roles in Zoho CRM
Introduction
Roles in Zoho CRM define your organization’s hierarchy and control how data is accessed between users. Higher-level roles automatically gain visibility into the records owned by users below them. With properly configured roles, you ensure secure, structured access to customer data while supporting team collaboration.
Key Concepts of Role Hierarchy
- Top-down access: Users in higher roles (e.g., Sales Manager) can view and manage records owned by their subordinates.
- Peer restriction: By default, users in the same role (e.g., VP Marketing & VP Sales) cannot view each other’s records.
- Superiors can access shared data: Enable the Superiors Allowed option in sharing rules to allow top-level access to shared records.
- Peer sharing: Use the Share Data with Peers option to allow users in the same role to access each other's data.
- Access control: Users must have at least read access to interact with records (e.g., add notes, attachments, or send emails).
Availability & Permissions
- Feature available in all paid editions
- Requires “Manage Roles” permission in the user’s profile
- Users with Administrator profile have full access, regardless of assigned role
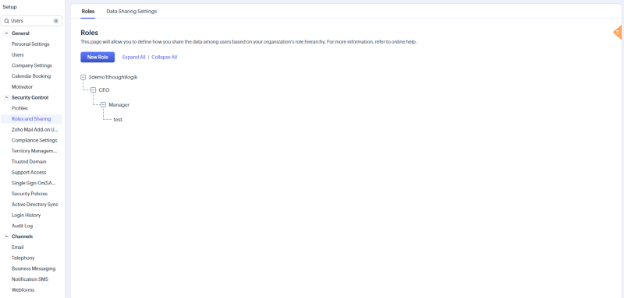
Default Role Structure
When you sign up, Zoho CRM includes two default roles:
- CEO
- Manager
You can create additional roles based on your organizational structure.
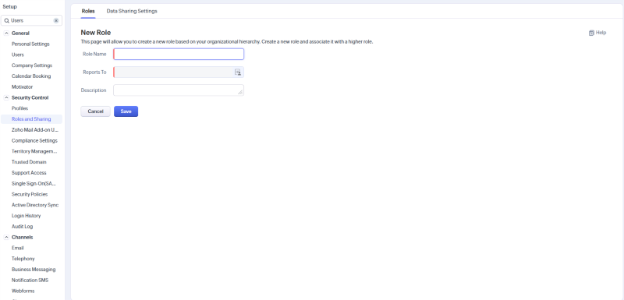
How to Create a New Role
- Go to Setup > Security Control > Roles and Sharing
- Click New Role
- In the New Role form:
a. Enter a Role Name
b.Select a Reports To role (superior)
c. (Optional) Check Share Data with Peers
d. Add a brief Description
- Click Save
Assigning Roles to Users
After roles are created, assign them to individual users.
- Go to Setup > General > Users
- Click a user name
- Click the edit icon next to Role
- Choose the new Role from the dropdown
- Click Save
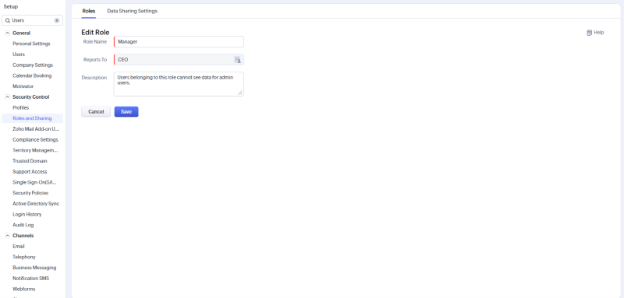
Editing a Role
You can update roles anytime to reflect changes in your hierarchy.
- Go to Setup > Security Control > Roles and Sharing
- Click the Role Name from the list
- Click Edit
- Update:
- Role name
- Reports To (superior role)
- Share Data with Peers option
- Click Save
Deleting a Role
Before deleting a role, transfer its users and child-roles to another role.
- Go to Setup > Security Control > Roles and Sharing
- Click the Role Name
- Click Delete
- Select an existing role to transfer child-roles and users
- Click Transfer & Delete
