How to Create Profiles in Zoho CRM
Estimated reading: 2 minutes 7 views
Introduction
Profiles in Zoho CRM allow administrators to control what users can view, create, edit, delete, or customize within the CRM. Whether it’s Sales, Marketing, or Support teams, each group may need different levels of access. Profiles help you define these permissions to ensure users see only what’s relevant to their role.
Step-by-Step Instructions:
Default Profiles
Zoho CRM includes two system-defined profiles that come preconfigured:
- Administrator
- Has full access to all modules and features in CRM.
- Cannot be deleted or restricted.
- Standard
- Has limited access to CRM features.
- Best suited for general team members with restricted capabilities.
Availability
- Available in all paid editions
- Required permission: Manage Profiles
Availability
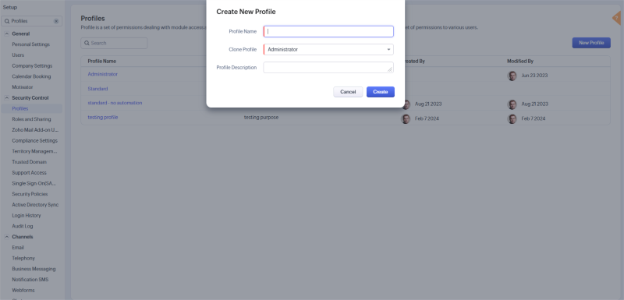
- Go to Setup > Security Control > Profiles
- Click on + New Profile
- In the Create New Profile page:
- Enter a Profile Name
- Choose an existing profile to clone (this copies its current settings)
- (Optional) Add a Profile Description
- Click Create
Cloning Existing Profiles
Instead of starting from scratch, you can clone an existing profile and customize it as needed.
- In the Profiles list view, click the more icon (⋮) next to a profile
- Select Clone
- Provide a new name and update any permissions you want to adjust
Tips:
Use cloning to quickly create department-specific profiles based on a shared structure.
