How to Create Widgets in Zoho People?
Estimated reading: 3 minutes 8 views
Introduction
Widgets in Zoho People allow you to extend the functionality of your application by embedding custom interfaces within dashboards, forms, or custom buttons. This helps streamline user interaction and supports custom workflows within the Zoho People environment.
This guide explains how to upload a widget, and how to add it to dashboards, related forms, and custom buttons.
Step-by-Step Instructions:
Uploading Your Widget in Zoho People
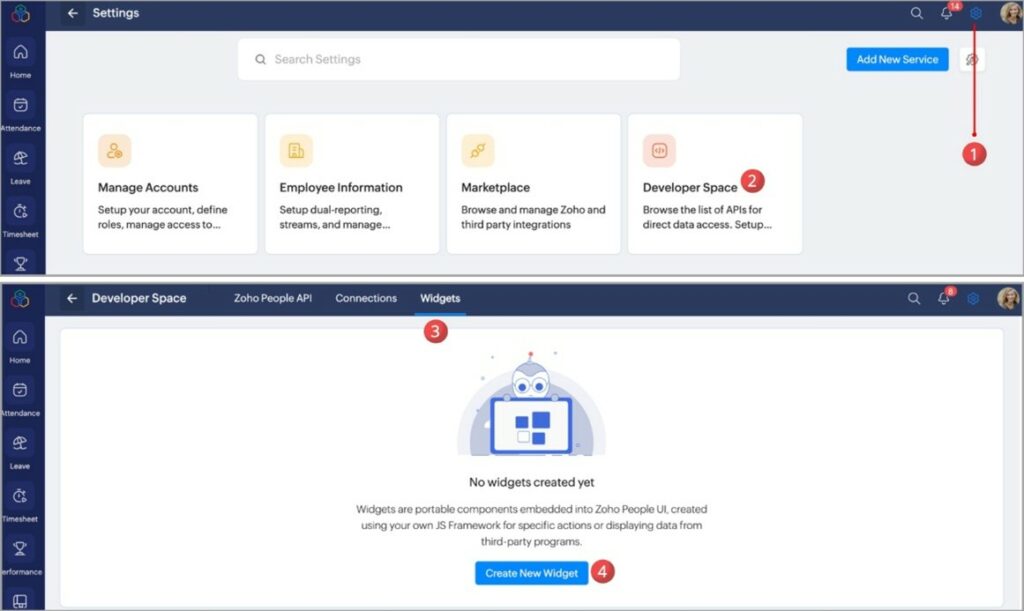
- Go to Settings > View All > Developer Space > Widgets.
- Click Create New Widget.
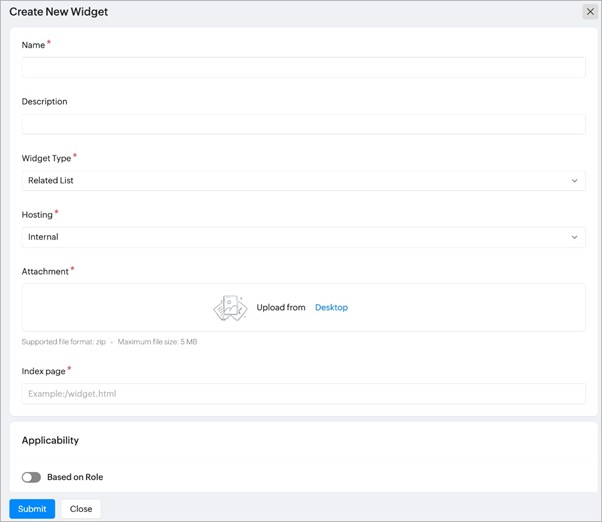
- Enter the name and description for your widget.
- Select the Widget Type (Dashboard, Related List, or Button).
- Choose the Hosting Method:
Internal Hosting:
- Select Internal from the Hosting drop-down.
- Click Upload and select the widget.zip file from your project’s dist folder.
- Enter the Index Page URL.
- Refer to the Create Internal Widget Using Zet-CLI Tool guide for development steps.
- External Hosting:
- Select External from the Hosting drop-down.
- Enter the public URL where your widget is hosted.
- External Hosting:
6. To control who can access the widget:
- Enable Based on role, and select the applicable roles.
7. Once uploaded, your widget can be added to a dashboard, form, or button as needed.
Adding a Widget to the Dashboard
- Go to Settings > View All > Developer Space > Widgets.
- Create a new widget and set Widget Type to Dashboard.
- The widget will be automatically added to your dashboard.
- To view the widget:
- Go to Home > Dashboard.
- The widget will appear at the end of your dashboard.
Adding a Widget to a Related Form
- Go to Settings > View All > Developer Space > Widgets.
- Create a new widget and set Widget Type to Related List.
- After uploading:
- Go to Settings > View All, and click on the service you want to extend.
- Select Extend Service > Forms.
- Click the form where you want to add the widget.
- In the Customization section, click the ellipsis icon.
- Select Related Forms Configuration > Widgets > Map Widget.
- A list of available related list widgets will be shown.
- Click Install for the desired widget, then click Save.
- To view the widget:
- Go to Operations > View All > [Service] > Related Form.
- Click on a record, and the widget will appear at the end of the record view.
Adding a Widget to a Custom Button
- Go to Settings > View All > Developer Space > Widgets.
- Create a new widget and set Widget Type to Button.
- After uploading:
- Go to Settings > View All, and click on the service where the button should be added.
- Select Extend Service > Custom Button.
- Click the dropdown and choose Add Custom Widgets.
- In the Add Custom Widgets dialog:
- Select the form where the button should appear.
- Select the widget to invoke.
- Set role-based access control.
- Choose the placement:
- In Record Listing – Widget will appear on the record listing page.
- In Record View – Widget will appear on the individual record view page.
- Click Add to complete the setup.
- To view the widget:
- Go to Operations > View All > [Service] > Related Form.
- Select or open a record to see the custom button widget.
Tips:
- Always test widgets in a sandbox environment before deploying them in production.
- Use role-based access control to manage visibility for sensitive widgets.
- Use the Zet-CLI tool for building internal widgets for better compatibility and deployment.
